Google Maps の使用方法
携帯端末の利用シナリオとして、道案内、旅先案内として地図情報を表示するのは非常に重要です。 単体のアプリケーションを利用するのも良いですが、必要に応じて自分のアプリケーションの中でも地図を使いたい場合は少なくありません。
Google Maps の API を使えば、地図を取り込み利用できます。React でも MapView というコンポーネントを使えば Google Maps を簡単に利用できます。
ここでは Google Maps の基本的な利用方法を説明します。
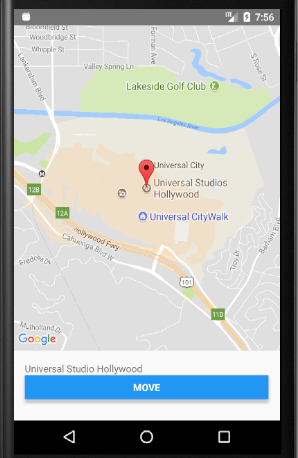
ここで作成する地図ソフト。ボタンで移動。マーカー付き
作成するサンプルプログラムは次のようなものです。
まず起動すると地図が表示されます。ここではユニバーサルスタジオハリウッドを中心とする地図とします。
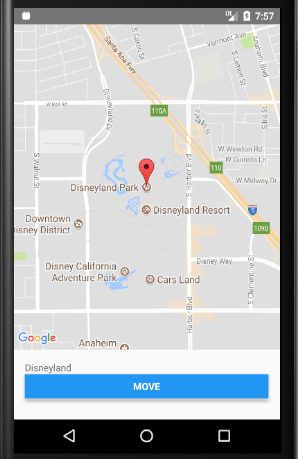
地図の下においた "Move" ボタンをタップすると、ディズニーランドを中心とする地図に切り替わります。
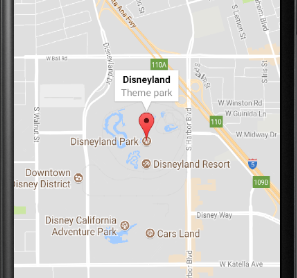
地図のポイントを表すマーカーをタップすると、ポップアップが表示されます。
このような動作をするプログラムを作成します。
プロジェクトの設定
まずはプロジェクトを作成します。ここでは map1 という名前で作成しました。
$ react-native init map1
$ cd map1
Android と iOS 両方をサポートする地図コンポーネントとして、react-native-maps を利用します。
$ npm install react-native-maps --save
$ react-native link react-native-maps
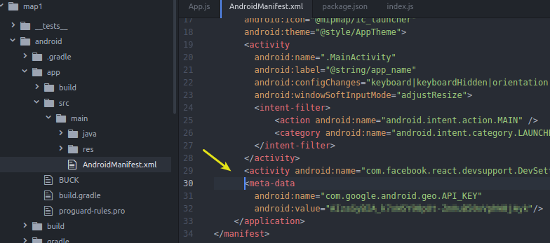
Google Maps API のキーが必要なので、Google のサイトで取得します。
また上記ページ内にキーの設定場所と設定方法が記載されているので、確認してください。
Android であれば、AndroidManifest.xml 内、application を閉じる直前に次のように 記載することになっています。
<meta-data
        android:name="com.google.android.geo.API_KEY"
        android:value="ここに取得したキーを設定"/>
React Native では android/app/src/main 以下にあります。
上記設定後、端末を接続、もしくはエミュレータを起動して、実行します。
$ react-native run-android
キーを設定前に run-android してしまうと、キーが取り込まれず地図が表示されないので起動しなおします。
コードは次のようになります。App.js を次のように編集します。
import React from 'react';
import {
  Platform,
  StyleSheet,
  Button,
  Text,
  View,
  Dimensions,
} from 'react-native';
import MapView from 'react-native-maps';

const { width, height } = Dimensions.get('window');
const ASPECT_RATIO = width / height;
const LATITUDE_DELTA = 0.0922/4;
const LONGITUDE_DELTA = LATITUDE_DELTA * ASPECT_RATIO;
const places = {
  disneyland: {
    label: 'Disneyland',
    region: {
      latitude: 33.8120918,
      longitude: -117.9189742,
      latitudeDelta: LATITUDE_DELTA,
      longitudeDelta: LONGITUDE_DELTA,
    },
    marker: {
      latlng: {
        latitude: 33.8120918,
        longitude: -117.9189742,
      },
      title: 'Disneyland',
      description: 'Theme park',
    },
  },
  universalstudio: {
    label: 'Universal Studio Hollywood',
    region: {
      latitude: 34.1381168,
      longitude: -118.3533783,
      latitudeDelta: LATITUDE_DELTA,
      longitudeDelta: LONGITUDE_DELTA,
    },
    marker: {
      latlng: {
        latitude: 34.1381168,
        longitude: -118.3533783,
      },
      title: 'Universal Studio Hollywood',
      description: 'Film studio and theme park',
    },
  }
}

export default class App extends React.Component {

  inPlace2 : boolean = false;
  placeName: string = '';
  marker1;

  constructor(props){
    super(props);
    this.placeName = places.universalstudio.label;
    this.state = {
      region: places.universalstudio.region,
      marker: places.universalstudio.marker,
    };
  }

  movePlace(){
    this.marker1.hideCallout();
    if(this.inPlace2){
      this.placeName = places.universalstudio.label;
      this.setState({
        region: places.universalstudio.region,
        marker: places.universalstudio.marker,
      });
    }
    else{
      this.placeName = places.disneyland.label;
      this.setState({
        region: places.disneyland.region,
        marker: places.disneyland.marker,
      });
    }
    this.inPlace2 = !this.inPlace2;
  }

  render() {
    return (
      <View style={{flex:1}}>
        <MapView
          style={{flex:1}}
          region={this.state.region}>
          <MapView.Marker
            ref={(ref)=>{this.marker1 = ref;}}
            coordinate={this.state.marker.latlng}
            title={this.state.marker.title}
            description={this.state.marker.description}
          />
        </MapView>
        <View style={{height:100,padding:16}}>
          <Text>{this.placeName}</Text>
          <Button title="Move" onPress={()=>this.movePlace()}/>
        </View>
      </View>
    );
  }
}
座標 (緯度経度) はハードコードしてあります。
this.state に region を保存しておき、 それを MapView の region 属性から参照します。
ボタンをタップしたときのハンドラである onPress では、 this.state をアップデートしています。
また、移動時にマーカーのポップアップ (特にコールアウトといいます) が開いていると、 元の情報が表示されたままになってしまうので、hideCallout を呼び出しコールアウトを閉じています。
そのためにマーカーの参照を MapView.Marker の ref から、 this.marker1 という変数にセットしています。
以上、React Native で Google Maps を利用する方法を説明しました。